Bottom-Up Window Blinds and Skylight Shades: Part 3 - Frame Assembly
In the previous article we looked at cloning an existing remote control channel to the ShadeSlider™ motor. In this article we'll take a look at assembling the frame and motor belt drive system.
The process of assembling the frame is straightforward, but the most difficult part of assembling the ShadeSlider™ is joining the sides with the top section that contains the motor and drive shafts. What follows is the recommended procedure.
(1) Set the Motor at the FULLY OPEN Travel Limit:
The motor is pre-set to the FULLY OPEN travel limit, but it is always a good idea to check this. Connect the 12v power supply to the motor as per the previous article and press the up or down button on the remote briefly to activate the motor, and note which button worked as the CLOSE button. If only one of the buttons works, it means that the motor was correctly set at the FULLY OPEN travel limit.
As soon as you can hear it rotating, press the STOP button; this motion will have moved it away from the FULLY OPEN travel limit.
Press the OPEN button to move it back to the FULLY OPEN travel limit. This process may seem unnecessary, but it insures that the motor is correctly positioned. When this procedure is finished you can disconnect the power to prevent it from moving.
(2) Insert the Drive Shafts:
Insert the hexagonal drive shaft into each side of the top frame. There is a hexagonal socket at each end of the motor that will receive the drive shaft, and it will slide into the socket about 1/2 inch (3 cm). You can use a flashlight to peer into the end of the top frame piece to see what the socket looks like.
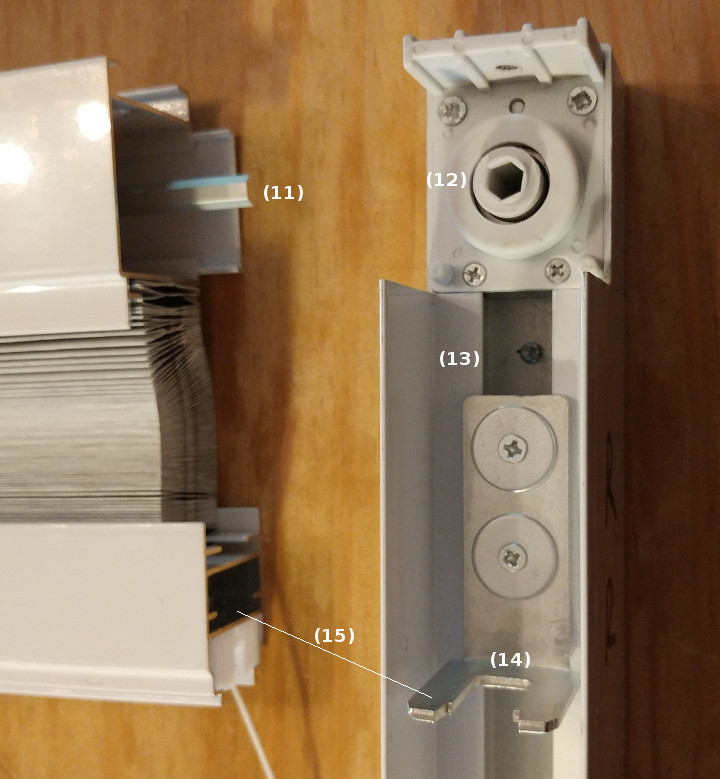
The exposed end of the hexagonal drive shaft will protrude from each side of the top frame. This picture shows what it should look like - see item (11).

(3) Set the Slider Bracket to the Top of Its Travel Limit:
The slider bracket (14) should be at the top of its excursion. You should be able to slide it up and down and see the belt drive socket (12) rotate; when you do this, please make sure it is correctly positioned at the top limit when finished.
(4) Align the Drive Shaft with the Belt Drive Socket:
Now that the drive shaft is inserted into the motor, chances are that it will be slightly out of alignment with the belt drive socket (12). This will make it difficult to insert the end of the drive shaft (11) into the belt drive socket (12) when you connect the side frame to the top frame.
However, you can align the socket with the drive shaft by moving the slider bracket (14) very slightly. This adjustment should be kept to the absolute minimum.
(5) Partially Connect the Side Frame to the Top Frame Piece:
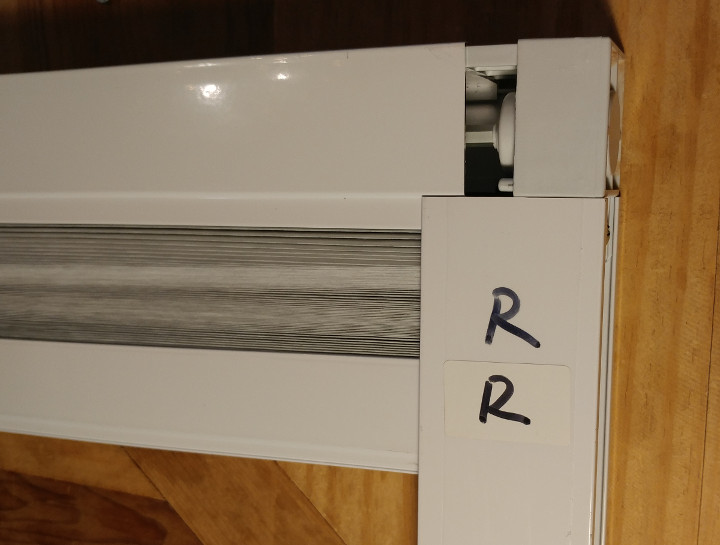
Please partially insert the frame side into the top of the frame, as seen in the following picture. The next step will be to connect the drive shaft to the belt drive socket, and it is important to follow the placement of the frame pieces as you see in the picture below.
The drive shaft will be very close to insertion in the socket, and there should be enough of a gap to get your fingers in there.

(6) Slide the Drive Shaft into the Belt Drive Socket:
At this point, you should be able to grab the drive shaft with your fingers and slide it into the belt drive socket. This action will make it slide out of the motor socket, so you only want to slide it about a 1/4 inch (1 or 2 cm) so that it is only just fitting into the belt drive socket. If you slide it too much, it will fall out of the motor socket and you'll have to repeat the procedure.
You must also make sure that the slider bracket (14) is correctly inserted into the hem bar (6), as seen in the first picture above (15). You can also slide the two sides into the bottom piece at this point.
(7) Complete the Joining of the Frame Pieces:
The side piece can now be fully inserted into the frame top. Although we have been talking mostly about one side, the procedure is exactly the same on the other side.
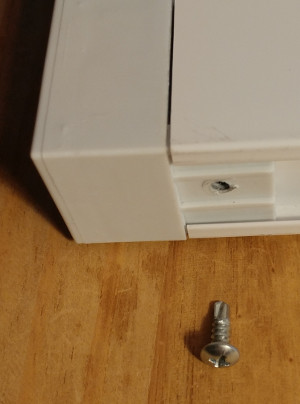
 There should be a plastic bag with screws that was supplied with the ShadeSlider™ kit. Please locate the short screws as seen in this picture. Each of the 4 corners is fastened by a single screw, and they all join together in a similar fashion.
When you complete the assembly by fastening the 4 corner screws in place, you'll find that the assembled frame is quite strong due to the method used to mate the 4 frame pieces together.
(8) Testing Time:
Once you have fastened all 4 corners, you can plug the power supply back in and test it. If you followed the instructions correctly, it should fully open and close, stopping automatically at the pre-set travel limits.
-----------
We sincerely hope you enjoy using these advanced motors; if you have any questions or require pricing, please feel free to contact us at any time!
Articles in this series:
Part 1: ShadeSlider™ Bottom-Up Blind & Skylight Shade: Component Layout, Motor Drive System
Part 2: ShadeSlider™ Bottom-Up Blind & Skylight Shade: Cloning Motor to Existing Remote
Part 3: ShadeSlider™ Bottom-Up Blind & Skylight Shade: Frame Assembly, Drive Shaft Insertion (you are here)
