Skylight Shades: Part 2 - Assigning A Remote
In the previous article we looked at the various component pieces that make up the ShadeSlider™ kit. In this article we'll take a look at assigning the motor to an existing remote control channel, with our 5 channel remote control.
The ShadeSlider™ system comes with a 5 ch remote control, but you should be aware that the motors use the same remote control digital radio protocol as our standard roller shade motors.
We also have a Z-Wave controller that can be used for the ShadeSlider™ system which would require assignment to the zwave group controller.
Also, if you haven't yet connected the power supply, please refer to the section at the end of this page.
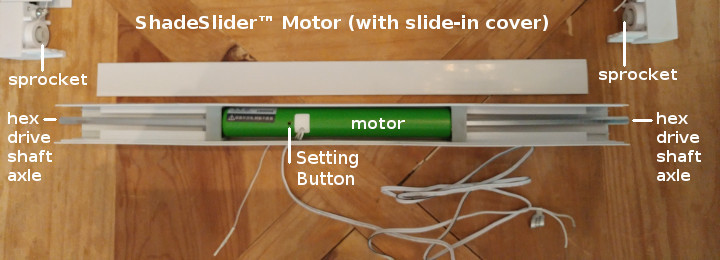
Assigning a channel is a simple operation; basically, you assign the signal from the remote control by pressing the setup button on the motor (next picture) to the remote control that we shipped under separate cover.
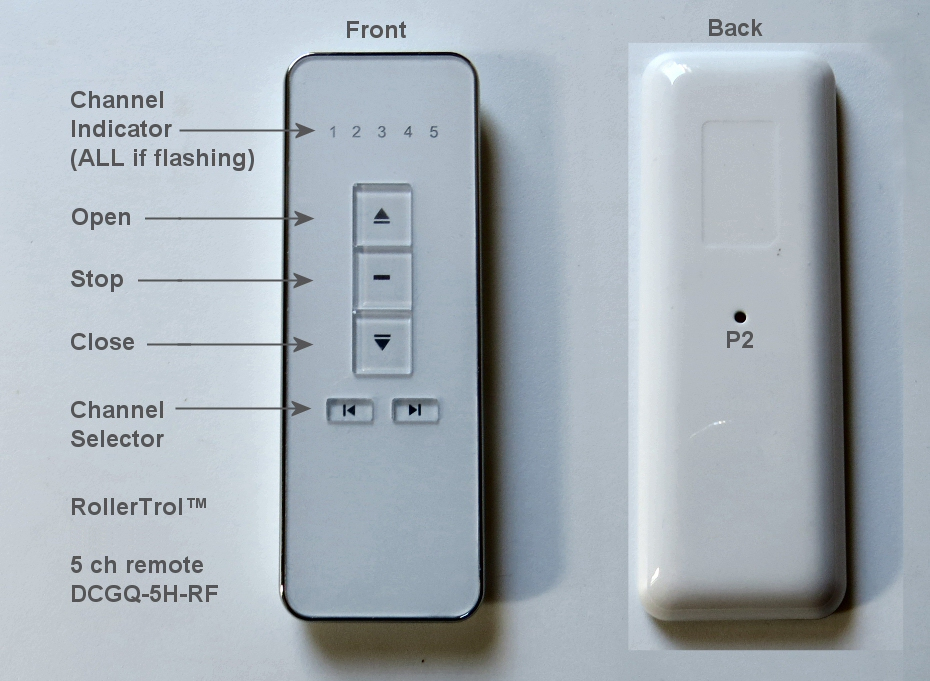
The first picture below shows the setting button on the motor. The second picture shows the 5 ch remote control front view, and the 5 ch remote back view. We have marked the P2 button on the back of the master remote.


Here is the channel assignment procedure:
- The next actions must be completed within 6 seconds of each other:
- Set the remote control onto the channel you want to assign.
- Press and release the setting button on the motor.
- Press and release the P2 button TWICE on the REMOTE that holds the channel you want to assign, the motor will jog each time (see picture above for setting buttons).
You can also clone this control signal to another remote:
- Press the P2 setting button once; the motor will jog, and the cloning procedure is done.
Here is the 'un-cloning' procedure:
- Follow the exact same instructions as above; the motor will jog to indicate the channel was removed from the the existing remote.
Please Note: Wait 10 seconds for programming cycle to complete before you clone another channel.
Attaching the Power Supply
The 12v DC motor uses a safe low voltage for operation; this also makes it suitable for RV and boating applications. For instance, it makes a great bottom-up shade for motorhomes - owners can maintain their privacy, but let in light at the same time. The same goes for apartment dwellers, or anywhere you might need privacy and light at the same time!
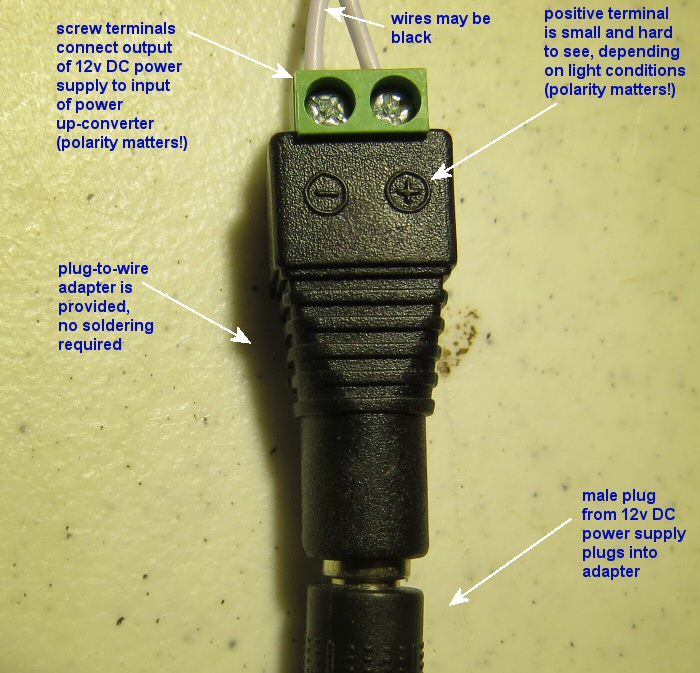
The 12v power supply you received uses a screw terminal adapter for an easy connection to the motor wiring; all you need is a small Philips or blade screwdriver to clamp the wires securely into the adapter (please note that the MOTOR wire with the black stripe is the negative terminal). The following picture is a close-up of the screw terminal adapter, with the power supply plugged into it:

PLEASE NOTE: We no longer use these connectors. We suggest that you directly splice the motor wire by cutting the POWER SUPPLY connector off (first make sure it is not plugged into an AC outlet). The red wire is positive, and the black wire is negative ground (you must observe polarity).
The MOTOR has a short piece of cable attached to it, and the black stripe is the negative side (the unmarked wire is positive).
After you cut the connector off of the power supply, please splice the wire by stripping a half inch (approximately) off all 4 wires and twisting the positive and negative wires together. If you need to insert a wire for a longer run, 16 gauge standard lamp cord is a good choice because it comes in different colors to match your decor.
If you accidentally connect the motor by switching the wires incorectly, it will do no harm, but the motor will not operate.
Using Screws for Mounting the Frame
As shown on page 1 of these instructions, there are two sliding tabs with screw holes on each side of the frame that are for mounting the skylight/window shade. The longer screws provided with the package can be used to fasten the ShadeSlider frame (assuming that they are the appropriate screws to use).
We sincerely hope you enjoy using these advanced motors; if you have any questions or require pricing, please feel free to contact us at any time!
Articles in this series:
Part 1: ShadeSlider™ Bottom-Up Blind & Skylight Shade: Component Layout, Motor Drive System
Part 2: ShadeSlider™ Bottom-Up Blind & Skylight Shade: Cloning Motor to Existing Remote (you are here)
Part 3: ShadeSlider™ Bottom-Up Blind & Skylight Shade: Frame Assembly, Drive Shaft Setup
